

- Customer Login
- Register
- Home
- Kitchens
- Bedrooms
- Home Office
- Help & Advice
- About Us
- Testimonials
- Contact Us
- Blog
How to use our Sliding Wardrobe Doors Designer
The fastest, easiest, most complete Sliding Wardrobe Door Designer on the Internet.
With our easy-to-use step-by-step on-line Sliding Door Designer you can very quickly create your own completely bespoke Sliding Wardrobe Doors and order them on-line.
There are around 50 different material/colour combinations available on-line which can be set in a choice of 10 different frame/finish combinations. These, together with the ability to place your panel dividers wherever you want enables you to create and tailor your own truly unique multi-panel design.
Get started now - just 3 easy steps:
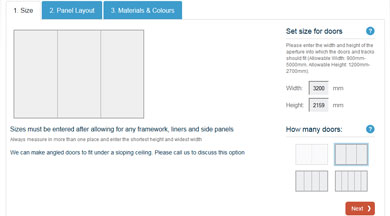
Step 1 - Measure the opening and enter the size
 Measure the aperture for the doors, after the installation of any framework, wall liners and floor plates etc. If you haven't installed any framework yet then you must allow for this. The framework we can supply is 18mm thick.
Measure vertically on each side and in the centre, as well as across both the top and bottom of the opening and use the smallest height and the widest width - measuring in millimeters - and allowing for the framework.
Enter these numbers in the appropriate size boxes.
The Designer will show you how many doors you can have for the width you have entered - just click on the appropriate doors diagram (bottom right) for the number of doors you would like. Advance to step 2.
Step 2 - Panel Layout
Here you can select a format for the design of your panels. The row of example doors at the bottom right of the screen has arrows either side to scroll through the 18 different designs. When you have identified the one you would like just click on it and then click on the individual doors in the big diagram. You can mix and match different formats on different doors. Under the diagram will appear the definition of the position of the bars for each door. When you have defined all your doors you can go to step 3.
For greater customisation you can define the individual panel heights within each door by using the following buttons (not available on tablets and touch screens):
| If you click on this button you can use your cursor to add additional bars to a door and to move them up and down. | |
| This button will allow you to copy the first door format to any other door you click on. | |
| .... and this one will allow you to mirror the bottom half of the design onto the top half. |
Go ahead and try them out - if you get in a pickle you can always click on the reset button
Step 3 - Select Materials
Now all you have to do is to select the materials for each of the panels within your doors and the frame style you would like.
There are 6 groups of panel materials which you can select from the drop-down:
- Coloured Glass
- Mirrors
- Patterned Glass
- Satin Glass
- Solid Colour Boards
- Woodgrain Boards
Within these groups you can select the colour or finish you would like (use the left and right arrows to scroll to additional colours). Just click on a colour and then click on the panel where you want that colour.
When you have coloured in all of your panels the Next button will appear - this takes you to the Frames tab where you select the frame you want - just click on it.
The Next button now takes you to the Extras tab where you can select any wall liners, floor plates and end panels you need. If you want soft-closers on each outer door just tick the soft-closer box.
The doors you have designed and tailored to your taste will now be priced and you can add them to the cart and place your order there and then.