Chic but not too shabby!
Many of us love the shabby chic look.
Done well, it can transform almost any piece of furniture from old and worn to refreshing and on trend. But when not done well, it can look just like a rather badly painted piece of old worn furniture!
Perhaps you are thinking of doing a bit of furniture upcycling yourself now that the long autumn evenings are here? But what is the secret? How can you ensure that your attempts at shabby chic really are chic rather than shabby?
SOURCE https://www.hercampus.com/school/msu/diy-how-shabby-chic-furniture
Here are our five steps to successful shabby chic:
- Get a solid foundation
The trick of successful shabby chic is to get the surface right before you start doing anything fancy to it. First and foremost you need to make sure that the item you are using is solid wood, as anything with a veneered surface will not achieve as good results. You then need to thoroughly clean your item with warm soapy water and give it plenty of time to dry out properly before you do anything else to it. Patience is definitely a virtue when it comes to shabby chic perfection!
- Surface repairs
Once your item is clean you can then make any small repairs or changes as needed. If anything wobbles or doesn’t work then now is the time to get it sorted. Also if you are aiming for a cracked paint effect, you can create cracks on the surface by rubbing a wax candle on the places you want the cracked effect; this will cause the paint to lift and peel wherever the wax has been applied.
- Begin to paint
Apply your first coat of paint – either matt or satin is best – direct to the item. You don’t need to use primer as you are aiming for a more rough and ready appearance; but you may decide to add more than one coat. You may also want this second coat to be a different colour from the first, in which case try then removing bits of the top coat with wax (as above) to enable the first colour to show through.
- Distress the surface
Once all the paint is thoroughly dry, you can create a distressed look by using sandpaper or steel wool to gently rub away the paint from the areas you want to distress until you achieve your desired result. If further peeling is required to create a more aged look, you can try using a heat gun on a low setting over your piece of furniture.
- Protect your work
Once you are completely happy, you can finish off your shabby chic item with one or two coats of matt or satin polycrylic. This will seal not only the paint that you have used but all the distressing effects. You may also want to wax your furniture from time to time. Both these measures will stop your shabby chic from quickly becoming just shabby!
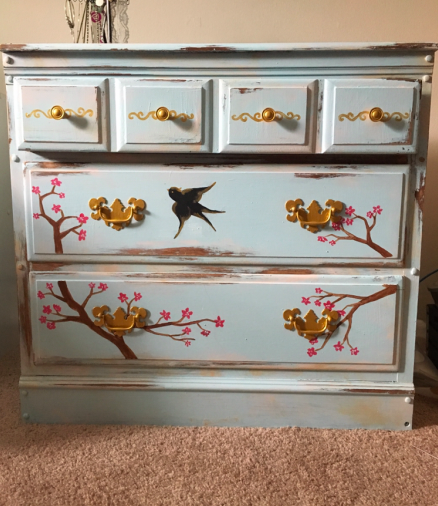
If you follow the above five steps, you should be well on the way to being confident about creating your own shabby chic furniture. Who knows, you may even become addicted! You can then take things one stage further by adding more decorative features to your furniture. We love the example in our image above of a Japanese Cherry Blossom design that was created on a shabby chic chest of drawers by using stencils.
Enjoy your shabby chic projects this autumn: and do remember to send us photographs here at DIY Homefit so we can see and share the results of your endeavours!